
Convolutional Neural Network and IoT: making an intelligent crib
Project Outline - TL;DR
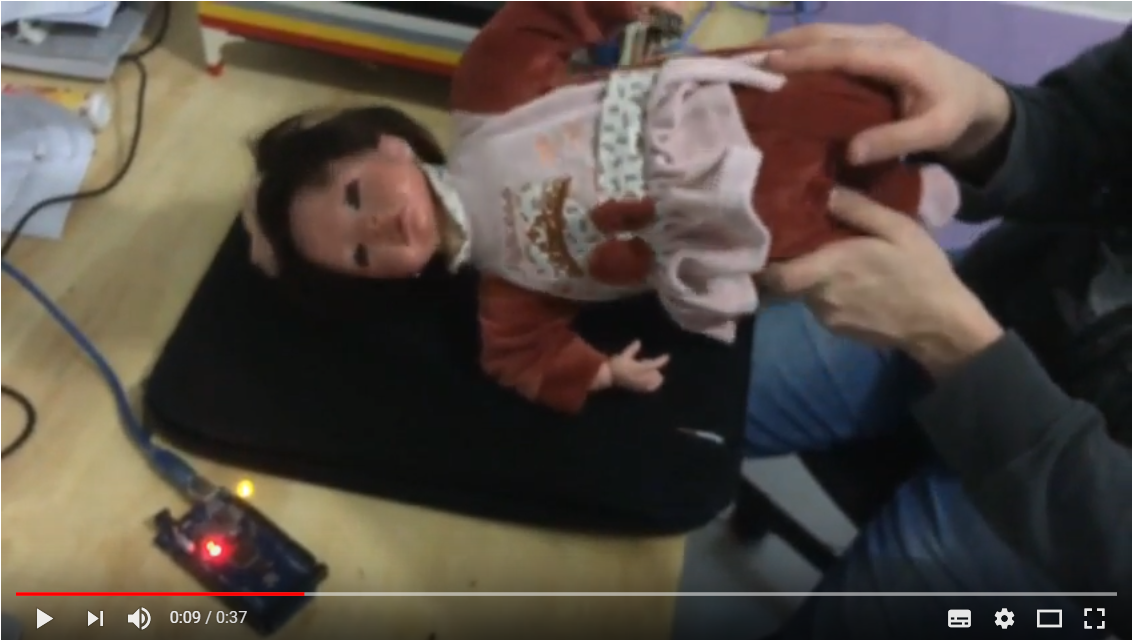
In this post I will show how we implemented and trained a Convolutional Neural Network to classify real image data from a doll to identify if a child is either facing up or facing down. To collect data in real time streaming, we used a cellphone and the DroidCam app, and to show our results,we connected the output (binary) to a led in a arduino. The video below is the projected working.
This kind of device could work as decision support system to identify dangerous positions of baby children and then take some action.
Introduction and Motivation
In this project we implemented a classifier based on images of a baby (actually, a doll as you can see below) to identify if the child is facing up or facing down. Our motivation comes from the fact that 4 in 1000 born alive children die from Sudden Infant Death Syndrome (Síndrome da Morte Súbita do Lactente, in portuguese), and there is no apparent reason for this fact, except that some studies show these risk factors increase when the child is sleeping facing down. [PINHO e NUNES, 2011, FLEMING et al. (1991)]
Basically, our main goal is to create a simple classifier that can be used with a cheap device coupled with the crib to identify when the children is on risk of facing down in a way that can be dangerous. Also, we developed an intelligent crib using arduino with other functionalities such as smoke/fire alert, heart rate detector (non-invasive), balance regulator controlled by an app created using MIT APP Inventor, as illustred by the images below. For the sake of brevity, we are not describing all functionalities here, therefore we are focusing on the Deep Learning component only.
Some notes before beginning
So we have a mission to implement an algorithm that is capable of identifying without human help if a child is turning up or turning down. We choose to help us with this task using the Deep Learning’s architecture called Convolutional Neural Network, that has achieved state of the art results in Image Recognition challenges. A tutorial in convolutional nets are out of scope of this post, here we will focus only in technical details about implementation and the resulted pipeline, to see more about it, I strongly recommend the course cs231n - Convolutional Neural Network hosted by Stanford University (I have done it myself), it has a vast and fantastic content about the topic and a lot more.
Data Collection
To start, we have to collect our data, as this was designed as a binary task (see that we could have done a multiclass problem labelling the child’s position or facial expression, but as you can imagine, this is hard to do with a doll), we took photos of the doll turning it up and turning it down, as illustrated below.
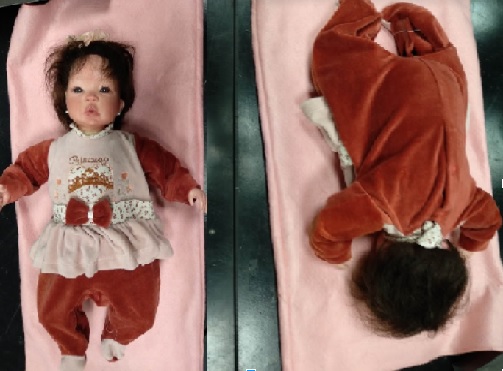
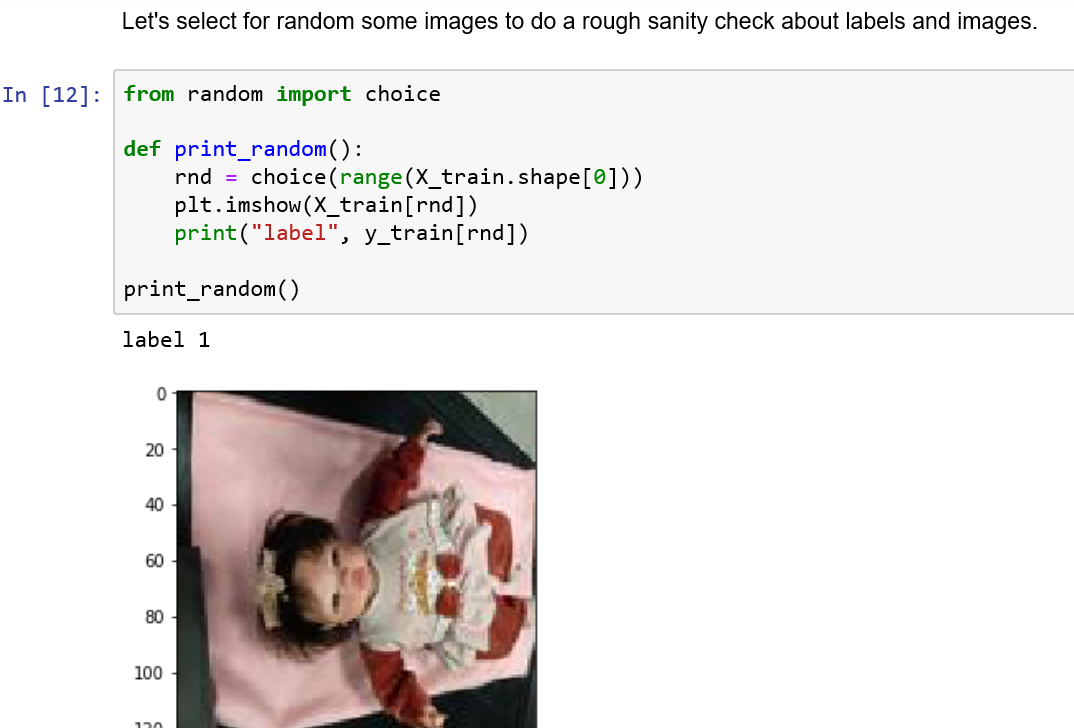
We took a total of 2513 photos and split 50/50 in train and test data, with classes balanced. We also labeled front data as 1 and back data as 0.
Note: You can run the notebook in my github repository to see the results, you must have anaconda package installed, as keras configured as well.
Data Preprocessing
As a preprocessing phase, we did two things: first, resized all images to 128x128x3 pixels, as they were originated as a high resolution by the cellphone (more on this later). Also, to train our model, is highly recommended that you normalize your inputs, this helps convergence of your network (more on this here: http://cs231n.github.io/neural-networks-2/#datapre). Here we normalized by dividng to 255, so all pixels are between 0 and 1.
from PIL import Image
from tqdm import tqdm

basewidth = 128

for path in tqdm(paths):
    for file in path:
        img = Image.open(file)
        hsize = basewidth
        img = img.resize((basewidth,hsize), Image.ANTIALIAS)
        img.save(file)
Model Archtecture and Training
The model on VGG architecture, but with fewer components, as this is a simple task, we show the code below.
from keras.models import Sequential
from keras.layers import Dense, Conv2D, MaxPooling2D, Dropout, Flatten

nClasses = 2
input_shape = img.shape

def createModel():
    model = Sequential()
    model.add(Conv2D(16, (3, 3), padding='same', activation='relu', input_shape=input_shape))
    model.add(Conv2D(16, (3, 3), activation='relu'))
    model.add(MaxPooling2D(pool_size=(2, 2)))
    model.add(Dropout(0.25))

    model.add(Conv2D(16, (3, 3), padding='same', activation='relu'))
    model.add(Conv2D(16, (3, 3), activation='relu'))
    model.add(MaxPooling2D(pool_size=(2, 2)))
    model.add(Dropout(0.25))

    model.add(Flatten())
    model.add(Dense(256, activation='relu'))
    model.add(Dropout(0.5))
    model.add(Dense(2, activation='softmax'))

    return model
As you can see, all activation functions are ReLu, with a softmax function in the output, dropout as regularizer, etc.
Before training, we divide our input by 255, as commented above, also transformed the output variable to categorical. To train, we used adam optimizer, and loss as binary_crossentropy, also since I am training on my notebook’s GPU, we choose 10 epochs and batch size of 32.
To finish, we save our model, below are some plots of the training loss and accuracy over each epoch, we can see a fast convergence as expected, we achive a accuracy of 97% on validation set, we do not need use cross validation and clearly from the plots below, our best model converges quickly as expected. So using a checkpoint feature included in Keras, we use this point as our weights for our model. Also, our choice of batch_size produce some peaks, as this is expected too, since we are sampling and note dealing with the entire dataset to ‘choose a path’ in the optimization procedure.

Model pipeline and putting it to work
Now we have our neural network trained and ready to do its job in classifying our new instances. In this phase of the project, we used two components: DroidCam app (https://www.dev47apps.com/droidcam/windows/) to get images in real time from a cellphone connected via wifi with the notebook, and arduino and its serial module in python to do a serial communication between our output (answer if the child is turning up or turning down, that is, 1 or 0) and the crib, that is represented by a green led in arduino.
The code below shows the pipeline. Remember: all preprocessing we did in the training phase must be repetead here, so image resizing, normalization are done in the real time processing phase.
Therefore, after we load our model, we have to choose the component of the came using OpenCV module in python, an extensible library to deal with image processing, through the command:
cap = cv2.VideoCapture(1)
This chooses the cellphone connected camera via DroidCam. The next step is to connect with arduino via serial communication based on port 9600 (a bluetooth can work as well)
ser = serial.Serial('COM5', 9600)
And now we have our pipeline as showed below. Note that if the predicted label from the neural model is 1, we write 1 bit to arduino, otherwise we send a zero bit, then, with a simple code we turn a green led on to indicate that the baby is facing up.
if cap.isOpened():
    i = 0
    while(True):
        i += 1
        ret, img = cap.read()
        img = cv2.cvtColor(img, cv2.COLOR_BGR2RGB)
        if i % it == 0:
            res = cv2.resize(img, dsize=(128, 128), interpolation=cv2.INTER_CUBIC)
            res = res / 255.
            res = res[np.newaxis,:,:,:]
            if np.argmax(model.predict(res, batch_size=1))==1:
                ser.write(b'1')
            else:
                ser.write(b'0')
Code for python server side
int ledPin = 13;

void setup() {
  Serial.begin(9600); // set the baud rate
  Serial.println("Ready"); // print "Ready" once
  pinMode(ledPin, OUTPUT);
}
void loop() {
  char inByte = ' ';
  if(Serial.available()){ // only send data back if data has been sent
    byte inByte = Serial.read(); // read the incoming data
    if(inByte=='1'){
      Serial.println(inByte); // send the data back in a new line so that it is not all one long line
      digitalWrite(ledPin, HIGH);
    }else{
      digitalWrite(ledPin, LOW);
    }
  }
  //delay(100); // delay for 1/10 of a second
}
Code for arduino component
Note: Our cellphone were getting BGR images instead of RGB images, so we need to do an extra step using cvtColor method from OpenCV
Conclusion and Future Work
As demonstrated in the beginning of this post this project was a success. Particularly, I think I learnt a lot, even though it seems a simple project looking into it now, however, how I was able to do by myself the same techniques and implementations used for top companies in Autonomous Car, and even companies that work with intelligent home systems like cribs, it was indeed satisfactory.
Some considerations are for the velocity gained on training in a GPU, approximately 5 minutes compared to almot 1 hour in my own CPU. Also, preprocessing and understand it is fundamental to make the project work properly.
In future, I would like to take a level up and make a more challenging project, to get a deeper knowledge in areas as Object Segmentation/Detection, Generative Models, and Transfer Learning, etc. If you have any ideas about projects of this kind, please, contact me via email or Linkedin
Comments, questions and critics are welcome, please, give me feedback about my work, I really appreciate. See you!
References
-
FLEMING, Peter J. et. al. Interaction between bedding and sleeping position in the sudden infant death syndrome: a population based case-control study. 301(6743):85-89. BMJ 1990.
-
PERES, Luiz César. Sudden unexpected infant death syndrome in Ribeirão Preto, Brazil. São Paulo Medical Journal, São Paulo, v. 116, n. 5, p. 1803-1807, 1998.
-
PINHO, Ana Paula; NUNES, Magda. Epidemiological profile and strategies for diagnosing SIDS in a developing country. J Pediatr. Rio de Janeiro. 87(2):115-122, 2011.TECHLINE. Manual de Instruções do Monitor de Pressão Modelo MG-20. Pág. 8. Dísponível em http://www.techline.com.br/manuais/mg20.pdf.
-
Neural Network. Available at: http://cs231n.github.io/neural-networks-1/#summary.